Side Dishes
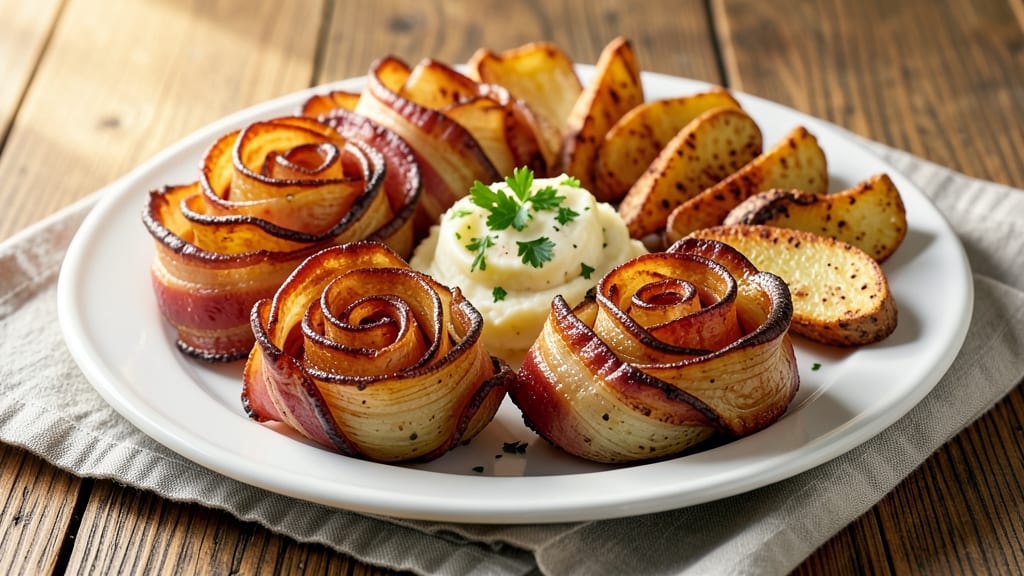
This bacon-wrapped potato roses recipe transforms humble potatoes into showstopping bites with crispy edges and smoky depth. The secret lies in carefully shaping the potatoes into perfect rosebuds before wrapping them in bacon—creating a dish that’s both visually stunning and irresistibly flavorful.
I developed this technique after years of perfecting oven temperatures and cooking times to ensure every bite delivers that satisfying crunch and rich, savory punch.
The process begins with waxy potatoes cut into precise strips, then shaped into delicate rose forms and baked until tender but firm. Wrapping them in bacon adds a luxurious, smoky flavor that pairs beautifully with the crispy exterior.
The key to success is baking at 400°F for just the right amount of time—long enough to render the bacon perfectly but short enough to keep the potatoes from turning mushy.
What you’ll end up with is a side dish that’s restaurant-worthy yet simple enough for any home cook. The golden-brown bacon crisps up beautifully, while the potatoes stay tender inside, creating a perfect balance of textures.
These potato roses make an impressive addition to holiday tables or game day spreads, guaranteed to impress even the most discerning guests.
For extra flair, sprinkle with fresh parsley or a pinch of smoked paprika before serving. Pair them with a tangy dipping sauce or serve alongside grilled meats for a complete meal.
The best part? Once you master the shaping technique, you’ll be able to create these elegant bites with confidence every time.
Ingredients for bacon wrapped potato roses
Transform humble potatoes into showstopping bites with these crispy, smoky ingredients.
| Ingredient | Amount | Notes |
|---|---|---|
| Yukon Gold Potatoes 🥔 | 2 lbs | Waxy variety for perfect shaping |
| Thick-Cut Bacon 🥓 | 12 oz | Applewood smoked preferred |
| All-Purpose Flour 🌾 | ½ cup | For dusting shaping board |
| Unsalted Butter 🧈 | 2 tbsp | Melted for brushing |
| Fresh Parsley 🌿 | ¼ cup | Chopped for garnish |
| Smoked Paprika 🌶️ | 1 tsp | For finishing touch |
| Diamond Crystal Kosher Salt 🧂 | 1 tsp | For seasoning potatoes |
| Ground Black Pepper 🌶️ | ½ tsp | Freshly cracked |
| Olive Oil 🫒 | 1 tbsp | For shaping board |
| Heavy Cream 🥛 | ¼ cup | Optional for dipping sauce |
| Garlic Cloves 🧄 | 2 cloves | Minced for dipping sauce |
| Lemon Juice 🍋 | 1 tbsp | For dipping sauce brightness |
The Yukon Gold potatoes are non-negotiable here—their waxy texture holds shape beautifully when cut into precise strips. Whole Foods or Trader Joe's carry them year-round, but if you're in a pinch, any waxy potato (like red potatoes) works. The bacon should be thick-cut—the kind that doesn't shrink into oblivion when cooked. Applewood-smoked bacon adds that extra depth, but hickory works too. For the shaping process, I always dust my board with all-purpose flour and drizzle with olive oil to prevent sticking. Trust me, this step makes all the difference when forming those delicate rosebuds.
No thick-cut bacon? Regular bacon cut into strips will work, but it'll crisp up faster. Running short on Yukon Golds? Red potatoes or fingerlings are your next best bet—just slice them slightly thinner. The dipping sauce is optional but worth it: that heavy cream, minced garlic, and lemon juice combo elevates these bites from side dish to star. For extra flair, swap the smoked paprika for a pinch of cayenne if you like a little heat. And if you're feeling fancy, use Parmesan crisps instead of bacon—same technique, totally different vibe.
These keep beautifully for 3-4 days in the fridge if you make them ahead, but honestly? They're best served fresh from the oven. The bacon stays crisp for about 20 minutes after baking, so serve them immediately if you're going for that perfect crunch. For make-ahead shaping, cut the potatoes and store them in cold water in the fridge for up to 2 days. The shaped roses can be wrapped in bacon and refrigerated on a tray for 12 hours before baking—this lets the flavors meld beautifully. Freezing isn't recommended, as the texture suffers when thawed.
Why You'll Love This Recipe
- Sheet Pan Magic: I swear by this recipe when I’m too tired to scrub pots—just slice, wrap, and bake. The potatoes steam right alongside the bacon, so you’re not stuck flipping or frying. One pan, minimal cleanup, and zero stress.
- Crispy-Creamy Obsession: That first bite? Crispy bacon meets fluffy, buttery potatoes with a hint of parsley—it’s like a hug for your taste buds. Honestly, I’ve made it for guests who don’t even like potatoes, and they’ve come back for seconds.
- Game for Any Gathering: Bring these to a picnic, toss them on a holiday table, or serve them at a casual dinner—they’re fancy enough to impress but simple enough for a weeknight. (Yes, even on a Tuesday night.)
- Budget-Friendly Luxury: Thick-cut bacon and Yukon Golds aren’t cheap, but a single batch stretches for leftovers or lunch the next day. Dredge the cooled roses in flour, pan-fry them, and boom—crunchy, savory snacks for days. Smart spending, big flavor.
Step-by-step instructions for perfect bacon-wrapped potato roses
Transform humble potatoes into elegant, crispy bites with this foolproof shaping and cooking method.
Prepare and Shape the Potato Dough
Begin by boiling the 2 lbs Yukon Gold Potatoes in salted water until completely tender—about 15-20 minutes. Drain and let them cool slightly, then peel and mash until smooth. I like to use a potato ricer for the best texture, but a fork works too if you're in a hurry.
Transfer the mashed potatoes to a large mixing bowl and stir in the 1 tsp Diamond Crystal Kosher Salt, 0.5 tsp Ground Black Pepper, and 1 tsp Smoked Paprika. This seasoning blend ensures every bite has that perfect balance of smoky depth and savory punch. The potatoes should be cool enough to handle but still pliable—this makes shaping much easier.
Create the Potato Rose Shapes
Lightly dust a clean surface with the 0.5 cup All-Purpose Flour and spread the potato mixture into a ¼-inch thick rectangle. Cut into 2-inch squares using a sharp knife. For the rose shape, cut each square diagonally from corner to corner, then cut each triangle in half again to create smaller triangles.
Roll each small triangle tightly into a cone shape, starting from the wide end. Pinch the base gently to secure, then twist the top to form a rosebud. Place all shaped potatoes on a parchment-lined baking sheet and cover with plastic wrap. Chill in the refrigerator for 30 minutes—this firming step prevents them from unraveling when wrapped in bacon.
Wrap with Bacon and Secure
Cut the 12 oz Thick-Cut Bacon into 12 equal strips, each about 3 inches long. Wrap one strip around each chilled potato rose, securing with a toothpick at the base. The bacon should overlap slightly at the seam to ensure full coverage. Arrange the wrapped roses on a wire rack set over a baking sheet—this allows air to circulate for even cooking.
Here's the thing—don't skip the toothpicks. They keep the bacon from unraveling during baking, and you can easily remove them before serving. Brush the bacon generously with the 2 tbsp Unsalted Butter, melted and cooled slightly. This creates a beautiful golden crust and adds extra richness to the final bite.
Bake Until Golden and Crispy
Preheat your oven to 400°F. Bake the bacon-wrapped roses for 20-25 minutes, flipping halfway through, until the bacon is deep golden brown and crispy. The potatoes should be heated through but still tender inside—you want that perfect contrast of crispy bacon and fluffy potato.
Watch carefully during the last 5 minutes of baking. The bacon crisps quickly at this stage, and you want it to be crunchy rather than rubbery. If any roses brown too quickly, tent them loosely with foil to prevent over-browning while the others catch up.
Prepare the Dipping Sauce and Garnish
While the roses bake, prepare the optional dipping sauce by combining the 0.25 cup Heavy Cream, 2 cloves Garlic Cloves (minced), 1 tbsp Lemon Juice, 1 tbsp Olive Oil, 0.25 tsp Diamond Crystal Kosher Salt, and 0.25 tsp Ground Black Pepper in a small saucepan. Heat over medium-low heat until warm but not boiling—about 3-4 minutes. Stir in the 0.25 cup Fresh Parsley just before serving for a pop of freshness.
Once the roses are done, remove the toothpicks and transfer them to a serving platter. Garnish with an extra sprinkle of Smoked Paprika for that final wow factor. Serve immediately with the warm garlic-lemon dipping sauce on the side—every crispy bite pairs perfectly with the creamy, tangy contrast.
Pro Tips For Making Bacon Wrapped Potato Roses
- USE COLD POTATOES: I learned this the hard way—warm potatoes squish into sad, lumpy roses. Chill your peeled Yukon Golds in ice water for 10 minutes first. The starch firms up, so they hold shape when wrapped. (Yes, even if you're impatient like me.)
- WRAP TIGHT, NOT TIDY: Skip the perfect spiral—overly neat wrapping cracks open during baking. Instead, fold bacon loosely around each potato, leaving ½-inch gaps. The bacon will shrink and seal those gaps naturally. (Your future self will thank you.)
- BAKE LOW AND SLOW: Crank the oven to 400°F for the first 15 minutes to render fat from the bacon, then drop to 350°F. I used to blast them at high heat, and they’d burn outside before cooking through. This two-step method guarantees crispy bacon and fluffy centers.
- DREDGE IN FLOUR BEFORE WRAPPING: Toss the potato roses in flour before wrapping them in bacon—it creates a crispy barrier that keeps them from sticking to the pan. Use about 2 tablespoons total; more just makes a mess. (This isn’t the prettiest method, but it’s the tastiest.)
Essential equipment for bacon wrapped potato roses
Must-Have Tools
Start with a sharp chef's knife—I use my Victorinox 8-inch—for clean potato cuts and precise bacon strips. A potato ricer (like the OXO Good Grips) creates ultra-smooth dough, but a fork works in a pinch.
For shaping, a lightly oiled marble cutting board prevents sticking, and I keep a small bowl of flour nearby to dust my hands and surface.
Baking Essentials
A wire cooling rack placed over a baking sheet is non-negotiable—it ensures bacon crisps evenly without steaming. I preheat my Lodge cast iron skillet in the oven for 10 minutes before baking to maintain consistent heat. For temperature control, a Thermoworks Smoke thermometer helps monitor the 400°F setting accurately.
Optional Upgrades
For fancy presentations, a miniature toothpick set (like Dexter-Russell 3-inch) keeps bacon securely wrapped. A pastry brush (I love Westcott's silicone brush) helps apply melted butter evenly. For make-ahead shaping, a silicone baking mat prevents sticking when chilling rosebuds in the fridge.
Budget-Friendly Swaps
No cooling rack? Use a clean wire mesh from a produce bag. Skip the ricer and mash potatoes with a potato masher—it still works great. For bacon, thin-cut bacon cut into strips works if you bake at 375°F for 15-20 minutes instead.
A spray bottle with water can replace flour for dusting if needed.
Pro Tips for Success
Keep a small bowl of ice water nearby to chill your hands between shaping batches—it prevents the potato dough from sticking. For extra crispiness, broil the finished roses for 1-2 minutes at the end.
I always line my baking sheet with parchment paper for easy cleanup, especially when dealing with melted butter and bacon grease.
Nutrition facts
Frequently asked questions
Can I use regular potatoes instead of Yukon Gold?
You can try, but Yukon Gold potatoes are ideal because their waxy texture holds shape perfectly when baked. For best results, use red potatoes or fingerlings—just slice them slightly thinner to ensure even cooking. Russet potatoes will work in a pinch, but they tend to dry out more quickly.
How do I prevent the potato roses from falling apart when wrapping?
Chill the shaped roses in the fridge for 30 minutes before wrapping to firm them up. Dust your work surface with flour and keep your hands slightly damp when shaping to avoid sticking. Using toothpicks to secure the bacon also helps maintain their shape during baking.
Can I bake these ahead of time?
Yes! Shape the potato roses and wrap them in bacon, then refrigerate on a tray for up to 12 hours before baking. For best texture, bake them fresh, but if needed, reheat in a 350°F oven for 5-7 minutes to restore crispiness. The bacon may lose some crunch when reheated, so serve immediately if possible.
What’s the secret to extra crispy bacon?
Use thick-cut bacon and bake at 400°F for the full 20-25 minutes. Brush with melted butter before baking for added richness, and avoid overcrowding the tray. For even more crunch, broil for 1-2 minutes at the end—just watch closely to prevent burning.
Are these good for a crowd? How many servings do they make?
This recipe makes about 12 potato roses, perfect for 4-6 people as an appetizer or side. For larger gatherings, double the ingredients—just ensure your oven has enough space for even baking. Serve with a dipping sauce or alongside grilled meats for a hearty spread.