Side Dishes
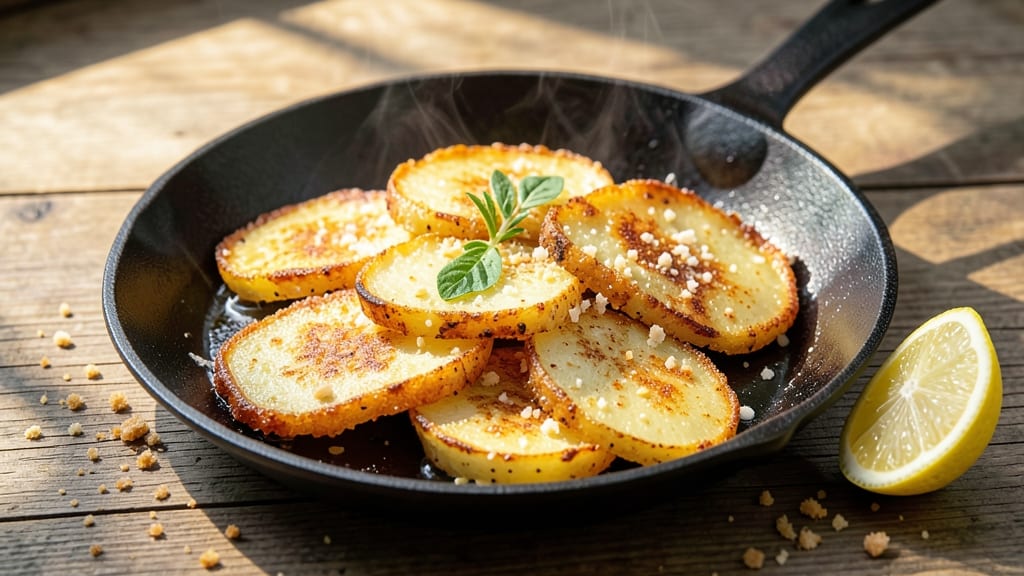
This battered potato slices recipe delivers crispy golden crunch in just 15 minutes, transforming simple potatoes into a restaurant-worthy side dish. The secret lies in a light, airy batter that creates a delicate crust while keeping the inside tender.
I’ve tested this method countless times—whether frying or baking—and it never fails to impress with that perfect balance of texture and flavor.
The process is straightforward: thinly sliced potatoes get coated in a simple flour-egg-breadcrumb mixture, then cooked until golden and crispy. You’ll need just a few pantry staples—flour, eggs, breadcrumbs, and seasoned salt—to achieve that addictive crunch.
The key is maintaining the right oil temperature (or baking time) to ensure every slice turns out perfectly, without being greasy or soggy.
What you’ll end up with is a dish that’s crispy on the outside, tender inside, and packed with savory flavor. These slices work as a standalone appetizer, a hearty side for burgers or steak, or even as a snack with dipping sauces like tartar or ranch.
The best part? They’re ready in under 15 minutes, making them perfect for weeknight dinners or game day spreads.
For extra crispiness, try air-frying or deep-frying, but oven-baking is just as effective if you prefer a lighter option. The variations are endless—add garlic powder, paprika, or even a pinch of cayenne for a spicy kick. Here’s how to make them foolproof every time.
Ingredients for battered potato slices
Simple potatoes transformed into addictive, crispy slices—just 10 ingredients, 15 minutes.
| Ingredient | Amount | Notes |
|---|---|---|
| Russet Potatoes 🥔 | 2 lb | Thinly sliced, even thickness |
| All-Purpose Flour 🌾 | 1 cup | For light, airy batter |
| Large Eggs 🥚 | 2 whole | Room temperature preferred |
| Panko Breadcrumbs 🍞 | 1 cup | Extra-crispy texture |
| Seasoned Salt 🧂 | 2 tbsp | Or garlic powder substitute |
| Vegetable Oil 🫒 | 2 cups | For frying, high smoke point |
| Garlic Powder 🧄 | 1 tsp | Optional for extra flavor |
| Paprika 🌶️ | ½ tsp | Smoked for rich color |
| Black Pepper 🌶️ | ½ tsp | Freshly ground preferred |
| Vegetable Oil Spray 🫒 | 1 tbsp | For baking alternative |
Russet potatoes are your secret weapon here—their low moisture content ensures crispiness. Grab the long, thin variety (like Idaho Russets) for even slices. Trader Joe's or Whole Foods carry them pre-washed, saving time. Look for firm potatoes with no sprouts—those soft spots turn mushy when fried. Slice them 1/8-inch thick using a mandoline for perfect uniformity (or hand-slice carefully). Soak the slices in cold water for 10 minutes before battering to remove excess starch—they’ll crisp up like magic.
No panko? Regular breadcrumbs work too, but panko’s airy texture is worth hunting down at Asian markets or the baking aisle. Seasoned salt can be skipped if you’ve got garlic powder and onion powder—just mix 1 tsp each for a homemade version. Vegetable oil is ideal for frying, but avocado oil has a higher smoke point if you’re deep-frying. For baking, swap the oil for olive oil spray—just coat the slices thoroughly. Pro tip: beat your eggs until frothy for an extra-light batter. The paprika adds color but isn’t mandatory—turmeric works for a golden hue without heat.
Fry in batches—don’t overcrowd the pan! These stay crispy for about 10 minutes if kept warm in a 200°F oven. For baking, 425°F for 15-20 minutes gives the same crunch. Store leftovers in an airtight container for 3 days, but honestly? They’re best fresh. Freeze fried slices between parchment paper for 1 month—re-crisp in the oven at 400°F for 5 minutes. Double the batch and freeze half—game day savior right there.
Why You'll Love This Recipe
- Crispy in Minutes: That panko crust turns golden in 12 minutes flat—no flipping or fussing. I swear by the Russets here; they stay creamy inside while that breadcrumb armor gets perfectly crunchy. (Yes, even if you’re the kind of cook who burns toast.)
- Salty-Satisfying Bite: The seasoned salt isn’t just garnish—it’s the star. That first crack of the crust releases this perfect balance of savory and sharp, like a hug from a food truck. Honestly, I’ve made these for potlucks, and people always ask for the recipe before tasting anything else.
- Game for Any Meal: Cold slices in a lunchbox? Check. Warm pile on a burger? Done. Even my picky teenager grabs these straight from the freezer. The batter clings so well that reheating (air fryer or oven) brings back that magic crunch every time.
- Pantry Magic: Three ingredients from your cupboard, zero specialty trips. Between us, I’ve made these with whatever flour I had—whole wheat, even—and they still turned out solid. And leftovers? They freeze like a dream, ready to rescue a lazy Tuesday night. (Not the prettiest, but the taste makes up for it.)
Step-by-step instructions for crispy battered potato slices
Here's how to achieve that perfect golden crunch every time—no shortcuts, just foolproof technique.
Prep and Slice the Potatoes for Even Cooking
Start by peeling the 2 lb Russet Potatoes if desired, then slice them into ¼-inch thick pieces using a mandoline or sharp knife. I like to cut them against the grain for better texture—this creates those satisfying crispy layers. Soak the sliced potatoes in cold water for 15 minutes to remove excess starch, which prevents sogginess and ensures maximum crispiness.
After soaking, drain and pat the potato slices completely dry with paper towels. Wet potatoes won't crisp properly—they'll steam instead of brown. Arrange them on a clean kitchen towel and let them air-dry for 10 minutes while you prepare the batter. This extra step makes all the difference for that perfect crunch.
Create the Light, Airy Batter
In a medium bowl, whisk together the 1 cup All-Purpose Flour, 2 tbsp Seasoned Salt, 1 tsp Garlic Powder, ½ tsp Paprika, and ½ tsp Black Pepper. I like to use a whisk for this step to avoid lumps—smooth batter coats the potatoes evenly. Make a well in the center of the dry ingredients.
In a separate bowl, lightly beat the 2 whole Large Eggs until just combined. Pour the eggs into the flour mixture and stir gently with a fork or rubber spatula. You're looking for a thick, pourable consistency—not too runny, but not stiff either. The batter should coat the back of a spoon but still flow freely when drizzled. This is your secret to that light, crispy texture instead of a heavy, greasy coating.
Set Up for Frying and Heat the Oil
Fill a deep skillet or Dutch oven with 2 cups Vegetable Oil to a depth of about 2 inches. Place it over medium-high heat and let it warm up for 5 minutes. You'll know it's ready when a wooden chopstick inserted into the oil produces gentle bubbles around it—but not so vigorously that the oil is smoking. Too-hot oil burns the outside before the inside cooks through.
While the oil heats, set up your dredging station: one bowl for the batter, another for the 1 cup Panko Breadcrumbs. Keep these separate—dipping potatoes in both creates that triple-layered crunch. I like to work in batches to avoid overcrowding the pan, which lowers the oil temperature and makes the potatoes greasy instead of crispy.
Fry to Golden Perfection in Batches
Working in batches of 4-5 potato slices at a time, dip each piece into the batter, letting any excess drip off, then roll it in the Panko Breadcrumbs until fully coated. Gently lower the coated potatoes into the hot oil. Don't overcrowd—they should sizzle immediately without touching each other. Fry for 3-4 minutes per side, turning once, until they're deep golden brown and crispy.
Here's the thing—you want that golden brown color, not pale yellow. If they're not browning fast enough, increase the heat slightly. Remove the potatoes with a slotted spoon and drain them on a wire rack or paper towel-lined plate. The rack keeps them crispy longer than a paper towel would. Repeat with remaining batches, maintaining the oil temperature between fries.
Serve Immediately with Your Favorite Dipping Sauce
Transfer the crispy potato slices to a serving platter and sprinkle with an extra pinch of Seasoned Salt while they're still hot. Serve immediately—they'll stay crispy for about 10 minutes after frying. I like to keep them warm in a 200°F oven if I'm not serving right away, but they're best fresh out of the oil.
These golden, crunchy potato slices are perfect for appetizers, game day snacks, or even as a side dish. The secret to their success lies in that perfect balance of thin, even slicing, thorough drying, and maintaining the right oil temperature. Trust the process, and you'll have crispy, golden perfection every time—no soggy slices in sight!
Pro Tips For Making Battered Potato Slices
- Pre-Slice, Don’t Peel: Russets have their best texture under the skin—peeling wastes flavor and makes the slices soggier. Use a mandoline or sharp knife to cut ¼-inch slices (thinner = crispier), but leave the skin on. I learned this the hard way after peeling a whole batch and ending up with sad, limp potatoes.
- Chill the Slices: Cold potatoes release less starch when battered, so they absorb less oil and fry up lighter. Toss your sliced potatoes in cold water for 10 minutes, drain well, and pat very dry with a towel—skip this, and your batter will turn to glue. (Yes, even if you’re impatient like me.)
- Double-Dip for Crunch: Panko alone doesn’t stick—dip the flour-coated slices in beaten egg, then press them into the breadcrumbs. The extra step guarantees a shatteringly crisp crust. I was skeptical until I tried it; now I won’t go back.
- Fry in Batches: Overcrowding the pan drops the oil temperature, leading to greasy, uneven cooking. Fry 2–3 slices at a time in 350°F oil until golden (3–4 minutes), then transfer to a wire rack. Your future self will thank you for not turning the kitchen into a sauna.
Creative variations of this recipe
Spicy Southwest Style
Transform these slices into a fiesta-worthy appetizer by adding 1 tbsp chili powder and ½ tsp cumin to the flour mixture. For extra kick, mix 1 tsp cayenne pepper into the seasoned salt.
Serve with a side of smoky chipotle ranch or mango-habanero salsa for dipping. I love pairing these with guacamole for a complete Tex-Mex spread—trust me, your guests will go back for more. 🌶️
Herb-Infused French Twist
For a sophisticated touch, swap the garlic powder for 1 tbsp fresh thyme leaves and 1 tsp dried parsley flakes. Add ½ tsp onion powder to the flour mix for depth.
These earthy flavors work beautifully with a white wine and herb aioli—just whisk ½ cup mayonnaise, 2 tbsp white wine vinegar, 1 tbsp chopped chives, and 1 tsp lemon zest. The crispy potatoes soak up the sauce perfectly. 🥖
Cheesy Pull-Apart Bites
Take these to the next level by mixing ½ cup shredded cheddar cheese into the panko breadcrumbs. After frying, transfer the slices to a baking sheet and sprinkle with an extra ¼ cup shredded mozzarella.
Broil for 1-2 minutes until the cheese melts and turns golden. These become irresistible pull-apart bites that disappear fast—ideal for parties or game day. 🧀
Air-Fryer Crunch
Skip the deep-frying entirely by using an air fryer for a lighter version. Lightly spray the battered slices with olive oil spray and cook at 375°F for 8-10 minutes, shaking the basket halfway.
The result? Crispy edges with a slightly softer interior—perfect for health-conscious eaters. I use this method when I’m short on time or oil cleanup. 💨
Breakfast Hash Upgrade
Make these the star of your breakfast by adding ½ tsp smoked paprika and ¼ tsp cayenne to the batter. Serve warm with a fried egg on top and a drizzle of sriracha hollandaise for a brunch-worthy dish.
The crispy potatoes hold up perfectly to the runny yolk—this combo is pure comfort food. ☕
Global Fusion Twist
For an Asian-inspired version, replace the seasoned salt with 1 tbsp soy sauce powder and ½ tsp five-spice powder. After frying, toss the slices in 1 tbsp hoisin sauce and top with chopped scallions and sesame seeds**.
These taste like a cross between French fries and spring rolls—absolutely addictive. 🌏
Nutrition facts
Frequently asked questions
Can I use sweet potatoes instead of Russet potatoes?
Yes, you can! Sweet potatoes work beautifully for this recipe, but they'll have a slightly different texture and flavor. Use the same slicing technique, but expect them to be denser and slightly sweeter. For best results, reduce the frying time by 30-60 seconds per side since sweet potatoes cook faster than Russet. Try adding ½ tsp cinnamon to the batter for a sweet-spicy twist.
Why are my potato slices soggy instead of crispy?
Soggy slices usually mean one of three things: wet potatoes, incorrect oil temperature, or overcrowding. First, ensure your potato slices are completely dry before battering—pat them thoroughly with paper towels and let them air-dry for 10 minutes. Second, maintain oil at 350-375°F—too cool oil makes them greasy, not crispy. Finally, fry in batches of 4-5 slices to avoid lowering the oil temperature. A wire rack keeps them crispy longer than a plate.
How can I make these without deep-frying?
For a lighter version, try oven-baking or air-frying! Preheat your oven to 425°F and bake the battered slices on a wire rack for 15-20 minutes, flipping halfway. For air-frying, cook at 375°F for 8-10 minutes, shaking the basket halfway. Lightly spray with olive oil spray before cooking to help crisp the batter. The texture will be slightly softer than fried, but still delicious.
What's the best way to reheat leftover slices?
Reheat in a 400°F oven for 5-7 minutes on a wire rack to restore crispiness. Avoid microwaving—it makes them soggy. For extra crunch, place them on a baking sheet and broil for 1-2 minutes after oven heating. Store leftovers in an airtight container for up to 3 days, or freeze for 1 month between parchment paper.
Can I make these gluten-free?
Swap regular flour for 1 cup gluten-free all-purpose flour and use gluten-free panko breadcrumbs. For extra crispiness, add 2 tbsp cornstarch to the flour mixture. The batter will be slightly different but still creates a delicious coating. Test with a small batch first to adjust consistency—gluten-free batters can be more delicate.